I own around 100 domains and they all started out as http (unsecure) websites. Google now treats https (Note: the S of httpS = secure SSL connection) as a ranking factor and with so many domains it’s taken a while to update them from http to https and below I’ll explain why!
I host my websites on a Godaddy VPS server running Apache Centos 6.9 and the control panel Virtualmin.
The general steps on how to migrate WordPress from HTTP to HTTPS described below will be valid for most domains on an Apache server, but the specific Virtualmin instructions are only valid for other Virtualmin users: cPanel or Plesk users for example will need to find relevant control panel instructions to find the relevant options to change.
Learn How to Make HTTP to HTTPS in WordPress Tutorial
- Part 1: Setup a Domain to use HTTP and HTTPS Without a Privacy Error Warning
- Part 2: Update WordPress to use HTTPS, not HTTP
- Part 3: Find Unsecure HTTP Links and Images and Update to Secure HTTPS
I’m in the process of converting the Classic Literature site from HTTP to HTTPS, a perfect opportunity to create a how to change HTTP to HTTPS WordPress tutorial as I update the domain.
I put this domain off because it consists of multiple sub-domains and is a combination of very old HTML webpages (originally created as *.asp pages, but now run as *.php, but still using the .asp filenames!) and new WordPress installations. The setup is a huge mess.
I’m using dozens of free Let’s Encrypt SSL Certificates and Private Keys and this is with domains I have hosted on one IP address: don’t need a unique IP address for each https domain. Other than time the change from HTTP to HTTPS didn’t cost a penny.
Part 1: Setup a Domain to use HTTP and HTTPS Without a Privacy Error Warning
When a domain lacks a valid SSL certificate it will output a Privacy Error warning when the https version of the site (https://classic-literature.co.uk/ the secure version) is loaded in a browser like Google Chrome and Firefox.
The Privacy warning has the following information:
Your connection is not private
Attackers might be trying to steal your information from md-law.classic-literature.co.uk (for example, passwords, messages or credit cards).
Visitors can add an exception for the domain (the above is a screenshot from one of the sub-domains), but it’s a multiple step process and realistically the majority of visitors are going to leave the website.
Technically a website doesn’t NEED to run under the https version (secure version) if the domain doesn’t collect private information, but Google uses https as a ranking factor either way, if you want to maximize Google SEO traffic you MUST run your site under the secure httpS version.
The SEO tutorial below covers setting up free SSL certificates from Let’s Encrypt and how to update a WordPress site from running under http (unsecure) to run under https (secure) without any issues.
Check the Domain’s Virtual Server has the Apache SSL Module Enabled
The Apache SSL Module (mod_ssl.so) needs to be on the server (most servers will have it) and the module must be active for each virtual server (each domain).
In one of the Apache conf files will be this line of code:
LoadModule ssl_module modules/mod_ssl.soOn my Godaddy Apache Centos 6.9 VPS it’s in the “etc/httpd/conf.d/ssl.conf” file, for other setups it could be in the main “etc/httpd/conf.d/httpd.conf” file and on other servers the httpd.conf file could be under a different directory. Fedora Core, CentOS, RHEL it’s “etc/httpd/conf.d/httpd.conf” but Ubuntu doesn’t have a “httpd.conf” file, Ubuntu uses and “/etc/apache2/apache2.conf“.
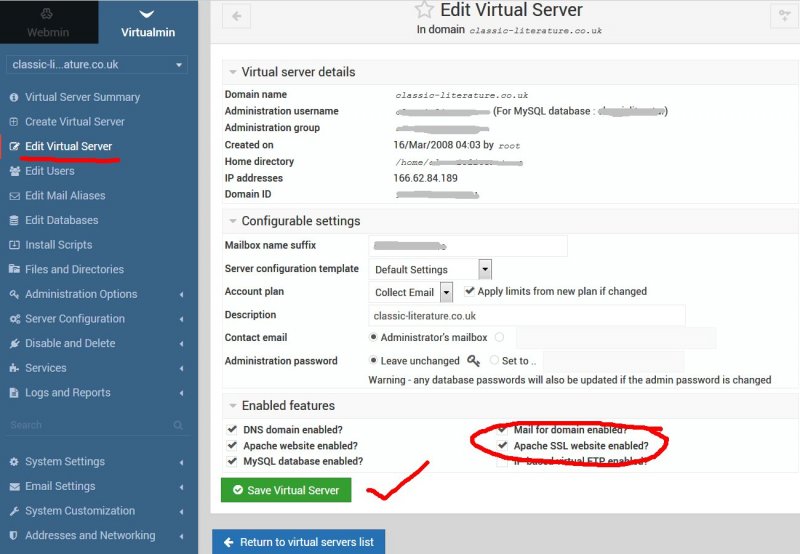
Under the Virtualmin control panel select the relevant Virtual Server and visit the “Edit Virtual Server” link on the menu.
Under the “Enabled Features” section make sure “Apache SSL website enabled?” is ticked and click the green “Save Virtual Server” button.
This enables the Apache SSL Module for that domain and creates a self-signed SSL certificate and SSL private key which doesn’t work: this is just step 1.
These are the files created:
- SSL certificate file – /home/domainname/ssl.cert
- SSL private key file – /home/domainname/ssl.key
Either inside your main “etc/httpd/conf.d/httpd.conf” file or specific domains “etc/httpd/conf.d/domainname.conf” file you’ll find this:
SSLEngine on SSLCertificateFile /home/domainname/ssl.cert SSLCertificateKeyFile /home/domainname/ssl.key SSLProtocol all -SSLv2 -SSLv3Since these are self-signed they aren’t respected by Google etc… and you will find browsers like Google Chrome will first give a warning when trying to load the https version of the site (see earlier screenshot).
No idea if the self-signed SSL certificate and SSL private key are created under other control panels, doesn’t matter since they don’t work and we will be replacing them with valid Let’s Encrypt SSL Certificates/Private Keys.
Install Free Let’s Encrypt SSL Certificates and Private Keys
This is really easy with the Virtualmin control panel, there’s a Let’s Encrypt Virtualmin/Webmin module which does all the heavy lifting.
If you don’t have a built in Let’s Encrypt module with your control panel, before discovering the Virtualmin module I used the manual process using Certbot and created a How to Install Free SSL Certificates Using Let’s Encrypt and Certbot Tutorial.
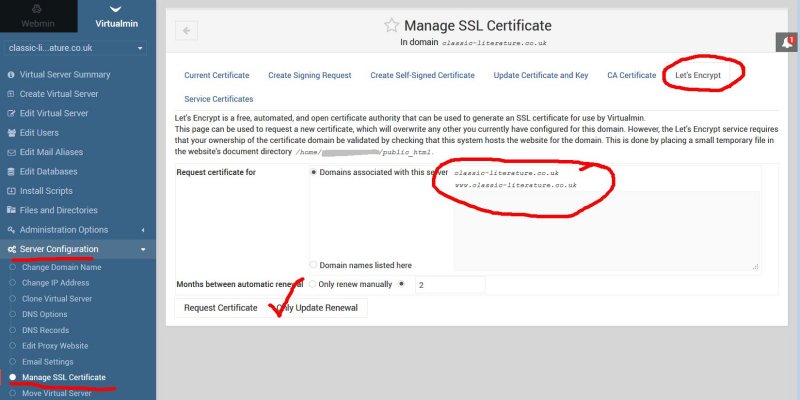
Under the Virtualmin control panel select the relevant Virtual Server and visit “Server Configuration” > “Manage SSL Certificate” link on the menu.
Click the “Let’s Encrypt” section and check which domains are listed under “Request certificate for” : “Domains associated with this server“.
The defaults are the www and non-www version of the domain, for the Classic Literature site it’s:
- classic-literature.co.uk
- www.classic-literature.co.uk
If that’s all the domains associated with the domain click the “Request Certificate” button and Virtualmin will connect to the Let’s Encrypt server, create the relevant certificate files, upload them to the domain under “/home/domainname” and setup relevant Cron Jobs to automatically update the SSL certificate files every 2 months: assuming you keep the default 2 month option. Let’s Encrypt Certificates expire after 90 days, so updating them every 2 months means they will always be valid.
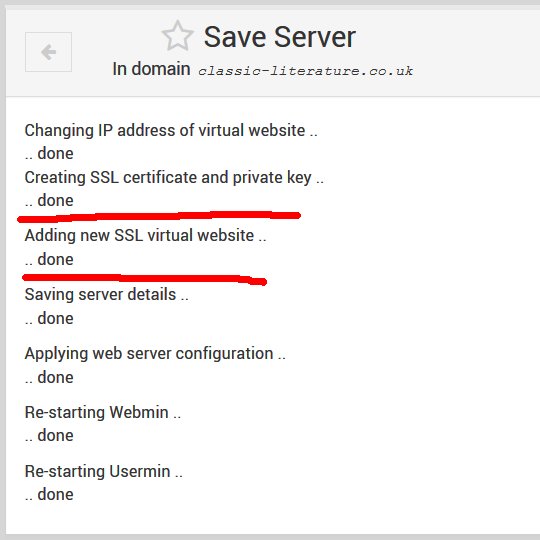
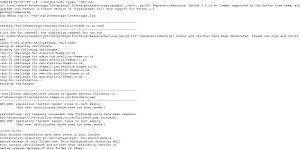
Assuming nothing went/goes wrong with the Cron Jobs etc… the Let’s Encrypt certificates will be created (see screenshot below) and will be updated automatically every 2 months.
That’s all you have to do, the https version should now work without any warnings. Test the https version of the site, if it works without the Privacy warning you’ve successfully created a free Let’s Encrypt SSL Certificate and Private Key which is running on your server.
If something goes wrong these are the files created:
- /home/domainname/ssl.cert
- /home/domainname/ssl.key
- /home/domainname/ssl.ca
- /home/domainname/ssl.combined
- /home/domainname/ssl.everything
And either inside your main “etc/httpd/conf.d/httpd.conf” file or specific domains “etc/httpd/conf.d/domainname.conf” file you’ll find something like this:
SSLEngine on SSLCertificateFile /home/domainname/ssl.cert SSLCertificateKeyFile /home/domainname/ssl.key SSLProtocol all -SSLv2 -SSLv3 SSLCACertificateFile /home/domainname/ssl.caThe above might help with troubleshooting certificate creation problems.
What About Sub-Domains?
If your domain has sub-domains you have two choices.
1. Go through the above process for each sub-domain, this will create a free Let’s Encrypt SSL Certificate for each sub-domain.
Or;
2. Before clicking the “Request Certificate” button (in Step 2.) tick the “Domain names listed here” option and in the relevant form field add a list of ALL sub-domains (add the www and non-www version for each sub-domain) including the two default domains (www and non-www version).
The Classic Literature site has multiple sub-domains, had I used this option I’d have created a list like this to add to the form:
- classic-literature.co.uk
- www.classic-literature.co.uk
- william-shakespeare.classic-literature.co.uk
- www.william-shakespeare.classic-literature.co.uk
- robert-louis-stevenson.classic-literature.co.uk
- www.robert-louis-stevenson.classic-literature.co.uk
Click the “Request Certificate” button and all the sub-domains will use the same SSL certificate and key.
I used method 1. to enabled the the Apache SLL Module etc… (as described above) for each sub-domain and installed a Let’s Encrypt Certificate for each.
I could stop the tutorial here if it were just about getting SSL working on a site. I’m afraid we are far from finished :-)
Part 2: Update WordPress to use HTTPS, not HTTP
Since you are updating a WordPress site which was setup to run under http and not https there will be multiple WordPress settings and database entries set for the http version of the site. They all need updating.
To complete the process and have a fully secure website requires a number of steps.
Set WordPress to Use SSL and HTTPS
There’s two versions of WordPress, the standard one site WordPress version and a WordPress Multisite Network version.
The Classic Literature site is setup to use the network version of WordPress, this makes it a little harder to convert to SSL/https.
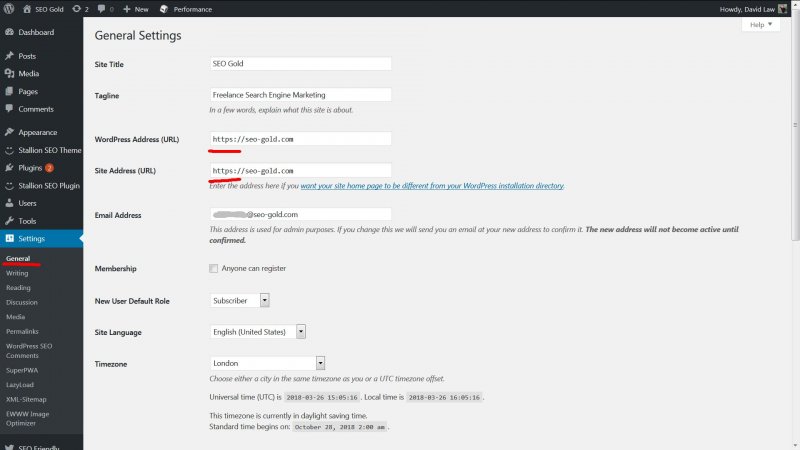
To convert the one site version of WordPress, log into the WordPress Dashboard, go to “Settings” > “General” and change both “WordPress Address (URL)” and “Site Address (URL)” from the http URL to the https URL and click the blue “Save Changes” button. Screenshot below from this website:
This will result in internal links etc… created by WordPress to use the https versions rather than http, but it doesn’t change any internal links etc… that’s been added manually via WordPress Posts, WordPress Pages or that have been added by WordPress Theme and Plugin features (will cover this later).
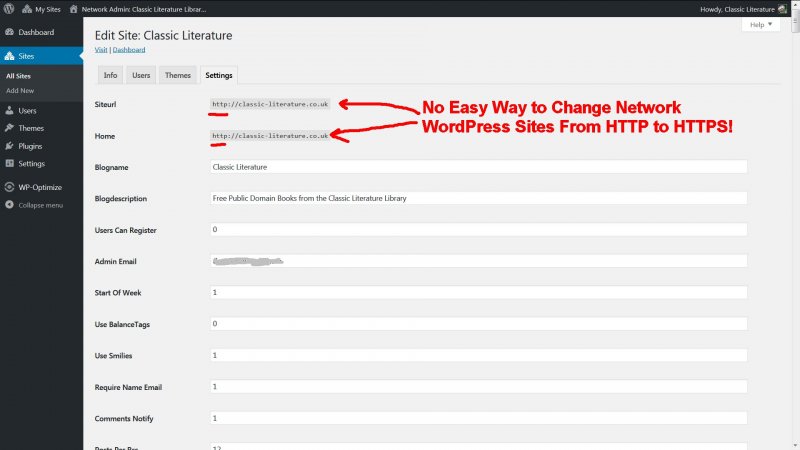
Unfortunately for network versions of WordPress I couldn’t find an easy “click this”, “click that” way to change WordPress Multisite Network from HTTP to HTTPS for the main site (site 1)!
You can see in the screenshot below the Classic Literature sites unsecure http URL is greyed out, it can’t be changed under https://domain.tld/wp-admin/network/site-settings.php?id=1.
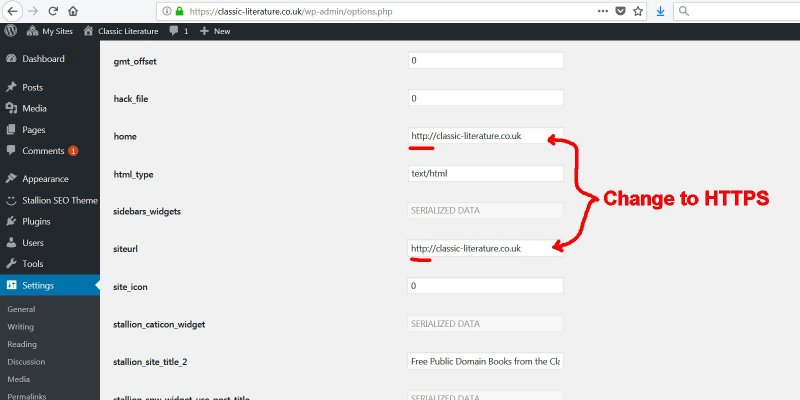
To change Site 1 (the main site) from http to https go to the hidden WordPress Options page https://domain.tld/wp-admin/options.php and change the two options “home” and “siteurl” to the https version.
After saving the WordPress hidden options page the greyed out URLs will be the https versions for network site 1.
If you have multiple WordPress sites, sites 2, 3 etc… can be modified normally under “My Sites” > “Network Admin” > “Sites” click each sites “Edit” link and change the “Site Address (URL)” to the https version.
At this stage core WordPress will run under https/SSL, but there will be left over theme/plugin options using http and manually created internal links using http instead of https. I’ll be covering internal links added to the main content, comments and as meta data in Part 3 via modifying database entries with various SQL search and replace rules: a handful of SQL rules can convert all http URLs in under 5 minutes.
With themes and plugins if you know a feature required the addition of a URL, go change it to the https version. I’m afraid it’s a case of go look through the theme/plugin options, if you see an internal http URL, change it to https. For example the WordPress SEO theme I develop includes a handful of options for adding URLs related to social media sharing, after updating to https I simply edited the http URLs to https.
Check any manually created widgets, if there are internal links (or links to other sites you own) update them to https.
Check your navigation menus, if you have Custom Links to internal webpages they will need updating. On the Classic Literature site the entire navigation menu comprised of Custom Links, ALL needed updating.
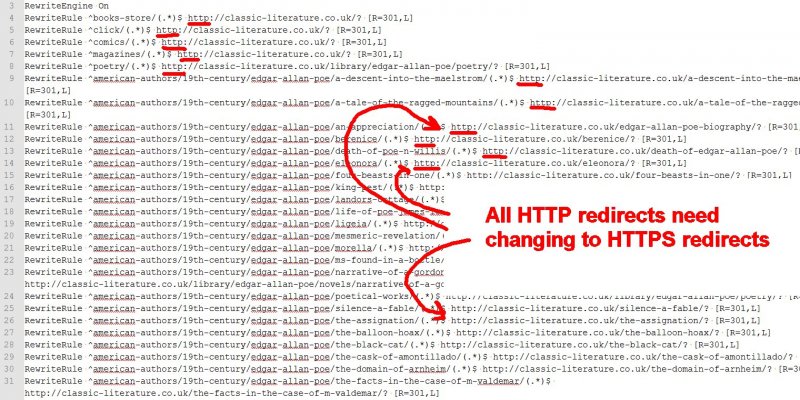
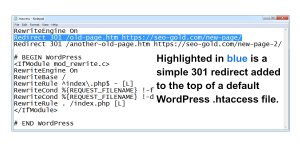
Don’t forget to check any 301 redirected webpages added to your sites .htaccess file.
The literature sites .htaccess file has over 150 301 redirect rules (from moving old content into WordPress) and they all needed to be changed to https.
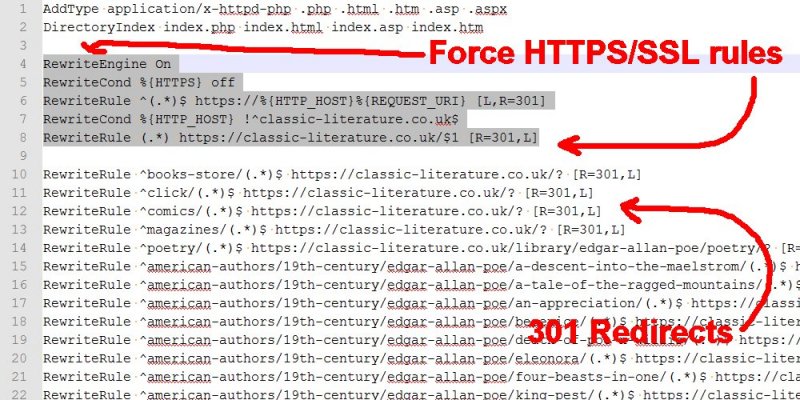
While on .htaccess rules let’s force all connections to use the https/SSL version of the site.
Force SSL/HTTPS in WordPress via .htaccess Rules
What we’ve achieved so far is a domain that works in both http (unsecure) and https (secure) versions, both can be accessed via a web browser which isn’t ideal. We don’t want Google to have access to the http version, we want all users to use the secure version.
There’s multiple ways to achieve this, one of the easiest is add a few rules to your site root .htaccess file to force all connections through the https/SSL version. After updating the .htaccess it won’t matter if a visitors access the site via https://classic-literature.co.uk/ or https://classic-literature.co.uk/ it will automatically load the https version.
Add these rules to the top of your root .htaccess file (above other rewrite rules) changing the two instances of domain.tld to your domain name.
RewriteEngine On RewriteCond %{HTTPS} off RewriteRule ^(.*)$ https://%{HTTP_HOST}%{REQUEST_URI} [L,R=301] RewriteCond %{HTTP_HOST} !^domain.tld$ RewriteRule (.*) https://domain.tld/$1 [R=301,L]If your .htaccess file already has a RewriteEngine On line you can safely remove (or leave) the extra copies. You only need it once at the top above the RewriteCond %{HTTPS} off line.
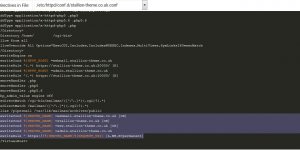
As mentioned earlier the Classic Literature site has a 150+ 301 redirect rules, so the new rewrite rules go above those. See screenshot below.
Once uploaded to the root of the site it will force all visitors through the https/SSL secure version of the site.
If you are very lucky all your WordPress webpages will only access secure https versions of scripts and images now, but let’s be honest you know there’s going to be more to do :-).
Part 3: Find Unsecure HTTP Links and Images and Update to Secure HTTPS
After updating the Classic Literature site using Part 1 and Part 2 of the Moving a WordPress Site from HTTP to HTTPS SEO Guide I knew there would be a number of resources still using the http versions.
Some of this will be due to internal links and images I’ve linked to manually inside Post content and others will be URLs added via plugin/theme features as Post Meta Data (added to the “wp_postmeta” database table).
On the Classic Literature site I have both, you can check your own site after http to https conversion by browsing various parts of the site and check if the browser reports it as fully secure.
In Google Chrome for example the Edgar Allan Poe Biography was reported as unsecure (fixed now).
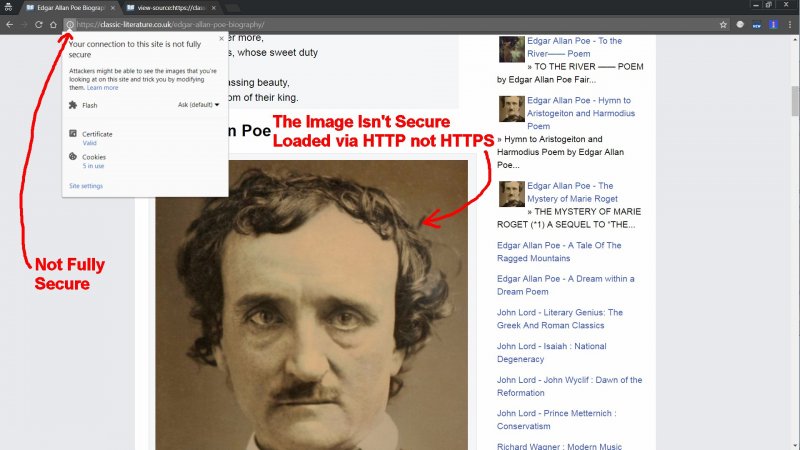
The obvious cause was the image I’d manually added to the main content which loads the image URL http://classic-literature.co.uk/wp-content/uploads/2017/01/edgar-allan-poe-photograph-600×840.jpg which isn’t the secure https/SSL version.
Easy fix would be edit the WordPress Post and add an s to the image URL, BUT I have dozens of Posts like this and I don’t fancy manually editing dozens of Posts to add an s!
Custom WordPress SQL Search and Replace Commands
There are SQL Search and Replace WordPress plugins which can modify content (there’s a plugin called Search & Replace by Inpsyde GmbH which looks interesting: not tried it), but I’ve got to modify Post content, Comment content, various Post Meta table data and some other stuff and I find it less worrying to use a few standard SQL search and replace commands under Virtualmin than trust a plugin.
This is really easy to fix via simple SQL search and replace commands when you know where/how to run SQL commands.
First thing we need to know is what is the name of your WordPress database table prefix. The database table prefix by default is “wp_“, it’s set when the site was first created.
You can find what it is via the “wp-config.php” file in the root of your site, it’s this line:
$table_prefix = 'wp_';The above one is the default “wp_“, if yours is something else modify the wp_ part of the SQL commands below.
The first SQL search and replace searches through the “wp_posts” table (related to Posts) and looks through the “post_content” (related to the Post Content) looking for all uses of “http://classic-literature.co.uk” and replaces them with “https://classic-literature.co.uk”.
update wp_posts set post_content = replace(post_content,'http://classic-literature.co.uk','https://classic-literature.co.uk');To run this SQL command.
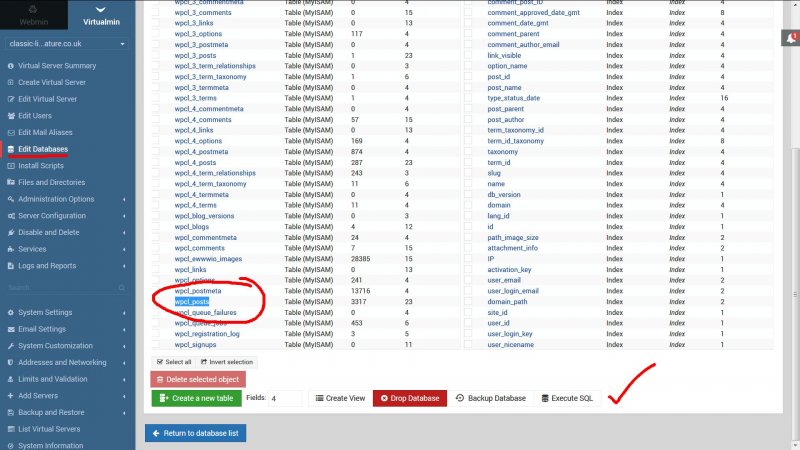
Under Virtualmin select the virtual server (domain) whose database you want to modify and select “Edit Databases” followed by the light blue “manage” button for the relevant WordPress database.
Here you will see all the tables associated with the WordPress database, in the screenshot below I’ve circled the equivalent of the “wp_posts” table (the table prefix for the site is “wpcl_” so the table is “wpcl_posts“).
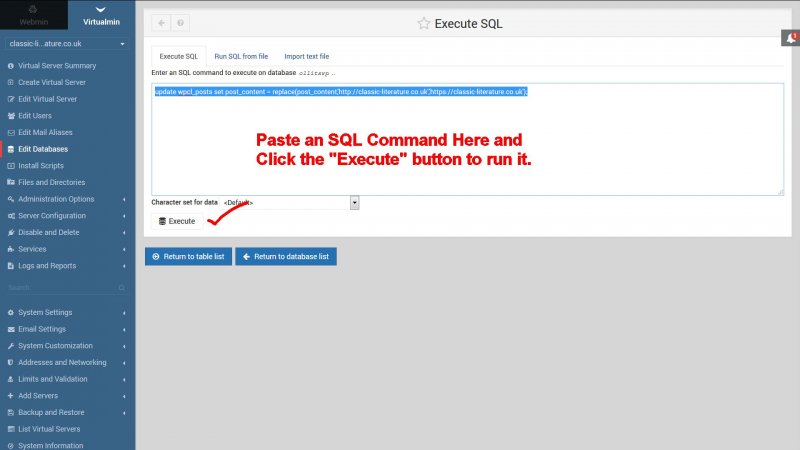
Click the “Execute SQL” button and in the form in the next screen and run this SQL command.
Update Internal http to httpS links within WordPress Post Content
update wp_posts set post_content = replace(post_content,'http://classic-literature.co.uk','https://classic-literature.co.uk');You don’t get much feedback from Virtualmin’s execute SQL commands, if it works you will see something like this on the next page:
Output from SQL command update wp_posts set post_content = replace(post_content,’http://classic-literature.co.uk’,’https://classic-literature.co.uk’); ..
No data returned
After running this SQL command every WordPress Post, WordPress Page and WordPress Attachment Page main content will have all the internal http links changed to https links.
To run another SQL command click the blue “Return to execute SQL Form” button.
Note: You could be lazy and replace all http for https, with this shorter command:
update wp_posts set post_content = replace(post_content,'http://','https://');BUT this will change links to external sites which might still be running under the http version, so best to take your time and use the specific command above.
I would suggest if you own multiple websites and interlink them together a lot, run multiple SQL search and replaces for each URL. For example on this site I might have some http links linking to the Classic Literature site and I could fix them all by running the first SQL command on this sites “wp_posts” database table.
Update Internal http to httpS links within WordPress Comment Content
The “wp_posts” SQL command above only deals with internal http links inside main content, we can run a similar SQL command on Comments by changing the database table from “wp_posts” to “wp_comments” and “post_content” to “comment_content”.
update wp_comments set comment_content = replace(comment_content,'http://classic-literature.co.uk','https://classic-literature.co.uk');This will search through all Comments content and replace internal links.
Update Internal http to httpS Comment Author Links
If you have a Comment Author URL set this can be replaced in old Comments with:
update wp_comments set comment_author_url = replace(comment_author_url,'http://classic-literature.co.uk','https://classic-literature.co.uk');Update Internal http to httpS links within WordPress Post Meta Data
Many WordPress themes and plugins add meta boxes to WordPress Posts for adding custom thumbnail images and/or other URLs (hreflang tags for example), these should be stored in the “wp_postmeta” table and can all be updated to https with the following SQL command:
update wp_postmeta set meta_value = replace(meta_value,'http://classic-literature.co.uk','https://classic-literature.co.uk');The above SQL command should update thumbnail images assume the theme/plugin feature didn’t use a custom database table.
Update Internal http to httpS links within WordPress Term Meta Data
If you have any theme/plugin features which modify Category/Tags like adding thumbnail images, this SQL command will update them as long as the feature used the correct database table (wp_termmeta):
update wp_termmeta set meta_value = replace(meta_value,'http://classic-literature.co.uk','https://classic-literature.co.uk');Some older Category/Tag thumbnail features don’t use the “wp_termmeta” table, in that case I’m afraid it’s a case of finding the name of the custom database table and build an appropriate custom SQL command. Though many WordPress sites have a handful of Categories/Tags, so might be simpler to edit the Categories/tags manually.
Update WordPress Post GUID URLs from http to httpS
WordPress Posts, WordPress Pages and WordPress Attachments are all given a guid (Globally Unique Identifier) which is the Post or image URL at the time of creation. Although the guid URLs shouldn’t be used by WordPress theme/plugin features (it’s not always accurate) it’s worth a few seconds to run the next SQL command just in case.
update wp_posts set guid = replace(guid,'http://classic-literature.co.uk','https://classic-literature.co.uk');If you’ve ever moved WordPress Posts from one domain to another (I do it a lot) the guid doesn’t update during the import process. For 99 out of 100 WordPress users it won’t make any difference if the WordPress guid URL is wrong, but a few weeks back I was updating a thumbnail feature and it wouldn’t work for some Posts because the guid of image attachments didn’t match the correct WordPress attachment URL (was the wrong domain and http).
On the site I was having problems with I’d moved WordPress Posts from several sources and the first version of the new feature I’d built was using a WordPress function that used the guid to find the image attachments ID: it worked for over 90% of images, but for images from imported Posts the thumbnails failed, to use that feature I had to run multiple versions of the guid SQL command above: one for each source URL. I rewrote the feature to not use the guid.
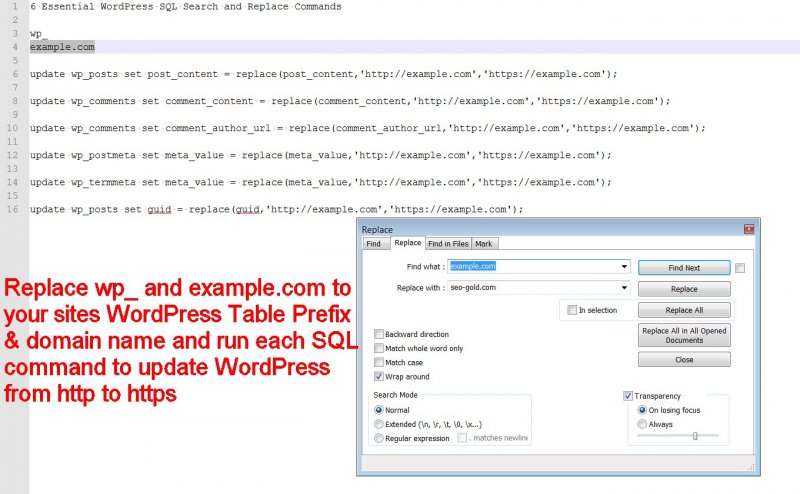
6 Essential WordPress SQL Search and Replace Commands
How the above works in practice is I have a txt file with this list of 6 SQL search and replace commands (the same commands I’ve added above):
update wp_posts set post_content = replace(post_content,'http://example.com','https://example.com');update wp_comments set comment_content = replace(comment_content,'http://example.com','https://example.com');update wp_comments set comment_author_url = replace(comment_author_url,'http://example.com','https://example.com');update wp_postmeta set meta_value = replace(meta_value,'http://example.com','https://example.com');update wp_termmeta set meta_value = replace(meta_value,'http://example.com','https://example.com');update wp_posts set guid = replace(guid,'http://example.com','https://example.com');I log into Virtualmin and go to the edit database screen and check what I set the WordPress table prefix to (the wp_ bit). I change all the instances of wp_ above to whatever the database I’m modifying is using. I change all instances of example.com to whatever the domain I’m converting to https.
I go to the relevant databases SQL execute screen and copy and paste the first SQL command above (the Post Content one) into the SQL execute form and click the execute button. I check a WordPress Posts content I know was using http URLs to confirm it’s updated, if it worked I go back to the SQL execute form and copy and paste the second SQL command above and repeat the process until all 6 SQL commands have been run.
I browse through the WordPress site looking for problems, unsecure webpages and if I got them all I’m done. In practice it takes around 30 minutes to update all http links this way. Could speed the process up, but better safe than sorry.
Change WordPress from HTTP to HTTPS Conclusion
If you managed to get this far through the WordPress HTTP to HTTPS SEO tutorial your entire WordPress site should now be running completely under HTTPS/SSL and every webpage visited should be reported as fully secure.
Might seem a lot of hassle just to move WordPress from HTTP to HTTPS, but it is important, a fully secure HTTPS site is trusted more by website visitors and Google.
HTTPS is a Google ranking factor, so don’t miss out on this low hanging SEO fruit.
Also from a web developer/SEO perspective when I see a website is still running under HTTP in 2020 it feels abandoned like no one cares enough to spend less than an hour updating HTTP to HTTPS. Suggests it’s not an important website!
David Law


